PIONEER CDJ-400
SETUP
Connections
Depending on the amount of CDJ-400 available units and other connected gear (mixers, other sound-cards etc), make the appropriate connections as described in the Advanced setup chapter
Firmware & Drivers
Firmware :
Update the firmware of each CDJ-400 unit to the latest version from https://www.pioneerdj.com/en/support/software/cdj-400/#firmware-update
Drivers :
Windows : Install the Pioneer ASIO drivers from https://www.pioneerdj.com/en/support/software/cdj-400/#drivers The ASIO drivers are optional. The Windows WASAPI drivers can be used instead as well.
Mac OSX: You don't have to install any driver. Mac OS standard audio driver will be automatically installed when you CDJ is connected to your Mac with a USB cable.
VirtualDJ 8 Setup
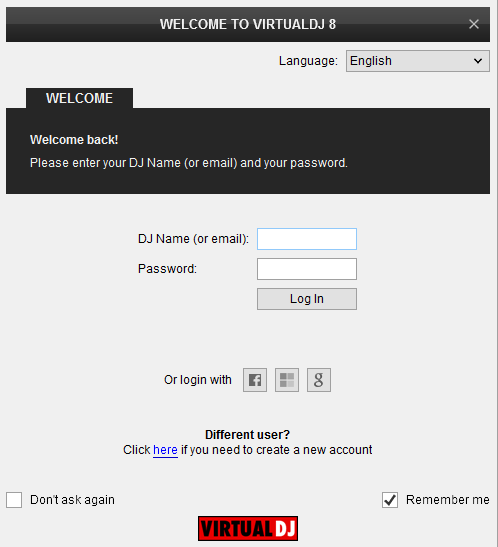
Once VirtualDJ 8 is opened, a Login Window will appear. Login with your virtualdj.com account credentials.
A Pro Infinity or a Pro Subscription License is required to use the Pioneer CDJ-400 with VirtualDJ 8. Without any of the above Licenses, the controller will operate for 10 minutes each time you restart VirtualDJ 8.
http://www.virtualdj.com/buy/index.html
Click on the Use Soundcard button in case the built-in sound cards of the CDJ-400 are used and VirtualDJ will automatically apply the necessary Audio configuration. See Advanced setup chapter for further details.
Click OK.
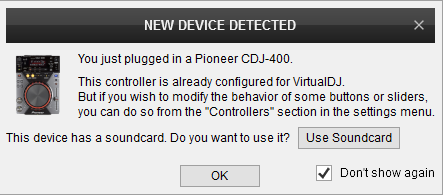
The unit is now ready to operate.
MIDI Operation
The unit should be visible in the CONTROLLERS tab of Config and the “factory default” available/selected from the Mappings drop-down list.
The factory default Mapping offers the functions described in this Manual, however those can be adjusted to your needs via VDJ Script actions.
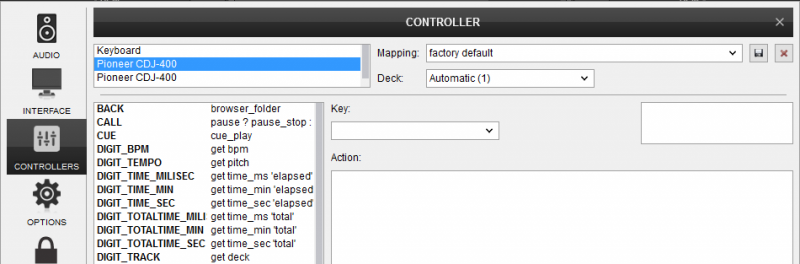
Note. Each CDJ-400 unit (if more than 1 is connected) will be additionally displayed in this window, and any modifications in the mapping file will affect all units.
Find more details at http://www.virtualdj.com/wiki/VDJ8script.html
AUDIO Setup
The unit has a pre-defined Audio setup and a special button in the AUDIO tab of Config to provide that. Alternative setups can be applied, depending your setup and the available units. See Advanced setup chapter

Refer to the manual of the unit for further features and setups.
https://www.pioneerdj.com/en/support/documents/cdj-400/
For further VirtualDJ settings and features please refer to the User Guide of VirtualDJ 8.
http://www.virtualdj.com/manuals/virtualdj8/index.html
Controls
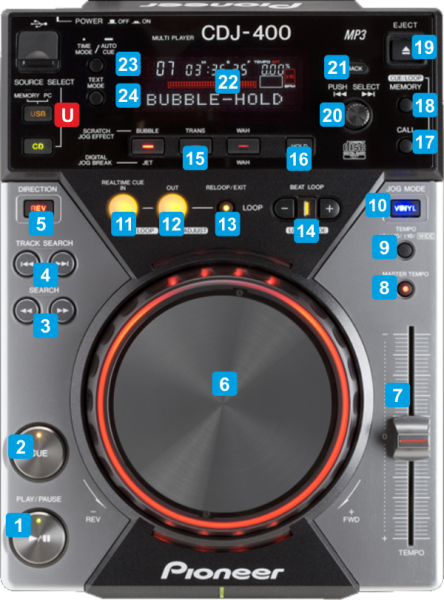
KEY
ACTION
When track is playing, press this button to return to the stored CUE position (or the beginning of the track if no CUE is set.
The LED of this button will blink if the track is paused but current position is not the stored CUE point and lit solid in all other cases.
When VINYL mode is enabled, use the upper/inner part of the wheel to scratch the track backwards/forward and the outer part (side) to pitch-bend (temporary speed-up/slow-down tempo)
When VINYL mode is disabled use any part of the jogwheel to pitch-bend (temporary speed-up/slow-down tempo)
See LOOP controls for loop in/out adjust.
When in loop, use this button to enable/disable Loop In Adjust mode (LED will blink fast) and then use the jogwheel to fine-adjust the entry point of the Loop.
When in loop, use this button to enable/disable Loop Out Adjust mode (LED will blink fast) and then use the jogwheel to fine-adjust the exit point of the Loop.
When a single CDJ-400 is connected the button is cycling assign through all the available skin decks.
when a pair is connected, the button is cycling through the left or right VirtualDJ decks (1,3,5 etc or 2,4,6 etc)
When focus is on the Files or Sideview lists, push the rotary to load the selected track to the assigned deck.
When focus is on the folders list, push the rotary to set focus to the Files list if the folder has tracks, or expand its sub-folders and move focus to the next one
The same line is used to temporary display the menu options and functions of the Multi-Buttons. See Multi-Buttons for further details.
Hold the button for more than 1 second to enable/disable Auto-Cue. When enabled (A.CUE is displayed on the LCD), the tracks will be loaded at the Hotcue 1 position (or the beginning of the track if Hotcue is not set)
Multi Buttons
The 3 available Multi-buttons can be assigned to Hotcue, Sampler or Effects mode individually and offer different VirtualDJ functionality depending on the selected mode. The assigned functions are saved across sessions.
HOTCUES mode
The Hotcue mode is the default selected mode for all 3 Multi-buttons. In this mode, the Multi-buttons save the current track's position to a Hotcue (1,2 or 3) if not assigned, or jump to that Hotcue point if Hotcues are already assigned. Additional functionality of the Multi-buttons in this mode is offered through a menu:
- Press the HOLD button. The LCD will display "Select Btn"
- Press one of the 3 Multi-buttons.
- If the Multi-button is set to Hotcue mode the LCD will display "1)Set CUE"
- Push the rotary to set the current track's position to Hotcue 1,2 or 3 (depending on the selected Multi-button)
- Turn the SELECT rotary to move on to the next option. The LCD will display "2)Erase CUE"
- Push the rotary to delete the saved Hotcue 1,2 or 3 (depending on the selected Multi-button)
- Turn the SELECT rotary to move on to the next option. The LCD will display "3) Modify Btn"
- Push the rotary to assign to a different mode (Sampler or Effects)
- Turn the SELECT rotary to move on to the next option. The LCD will display "4)Exit Menu"
- Push the rotary to exit the menu without operating any function or keep turning the SELECT rotary to choose one of the previously mentioned functions.
SAMPLER mode
How to select the Sampler mode for a Multi-button:
- While in Hotcue (or Effects) mode, press the HOLD button
- Turn the SELECT rotary to get the menu option "3)Modify Btn"
- Push the rotary to select it.
- Turn the SELECT rotary until the menu option "2) sampler" appears.
- Push the rotary to set the Multi-button to the Sampler mode
- Turn the SELECT rotary to select a sample from the loaded Sampler Bank
- Push the rotary to assign the desired sample to this Multi-button
.
In this mode, the Multi-buttons trigger the selected sample from the selected VirtualDJ Sampler Bank. Additional functionality of the Multi-buttons in this mode is offered through a menu:
- Press the HOLD button. The LCD will display "Select Btn"
- Press one of the 3 Multi-buttons.
- If the Multi-button is set to Sampler mode the LCD will display "1)Record"
- Push the rotary to record the deck into a new Sample.
- Turn the SELECT rotary to move on to the next option. The LCD will display "2)Load"
- Push the rotary to assign this Multi-button to a different sample.
- Turn the SELECT rotary to move on to the next option. The LCD will display "3) Modify Btn"
- Push the rotary to assign to a different mode (Hotcues or Effects)
- Turn the SELECT rotary to move on to the next option. The LCD will display "4)Exit Menu"
- Press the Multi-button to exit the menu without operating any function or keep turning the SELECT rotary to choose one of the previously mentioned functions.
EFFECTS mode
How to select the Effects mode for a Multi-button:
- While in Hotcue (or Sampler) mode, press the HOLD button
- Turn the SELECT rotary to get the menu option "3)Modify Btn"
- Push the rotary to select it.
- Turn the SELECT rotary until the menu option "3) effects" appears.
- Push the rotary to set the Multi-button to the Effects mode
- Turn the SELECT rotary to select a VirtualDJ Effect
- Push the rotary to assign the desired effect to this Multi-button
.
In this mode, the Multi-buttons trigger the selected effect. Additional functionality of the Multi-buttons in this mode is offered through a menu:
- Press the HOLD button. The LCD will display "Select Btn"
- Press one of the 3 Multi-buttons.
- If the Multi-button is set to Effects mode the LCD will display "1)Select FX"
- Push the rotary to select a different VirtualDJ Effect
- Turn the SELECT rotary to move on to the next option. The LCD will display "2) Modify Btn"
- Push the rotary to assign to a different mode (Hotcues or Sampler)
- Turn the SELECT rotary to move on to the next option. The LCD will display "3)Exit Menu"
- Push the rotary to exit the menu without operating any function or keep turning the SELECT rotary to choose one of the previously mentioned functions.
ADVANCED SETUP
The CDJ-400 is equipped with a built-in 2-channel sound card, which can be used to output the audio of a VirtualDJ deck. In most of the cases a pair of CDJ-400 along with an analogue/digital mixer is used, but other combinations can be used as well.
A. SINGLE UNIT - NO MIXER
In case a single unit is available and no mixer, you could still operate your CDJ-400 with VirtualDJ and control any VirtualDJ deck.
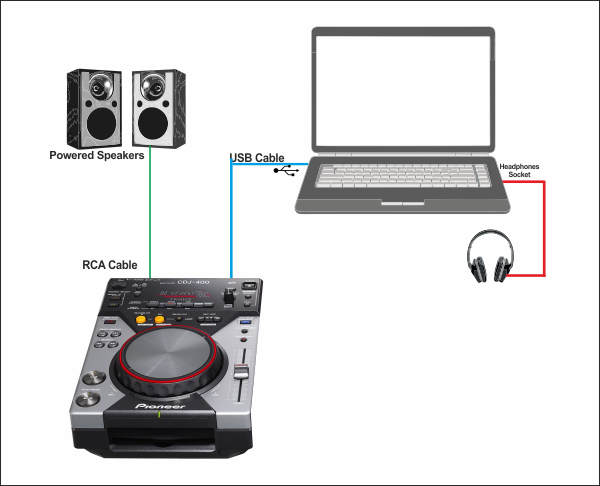
- Connect your CDJ-400 with a USB port of your computer using a USB cable.
- Connect the Audio Output of the CDJ-400 with a pair of amplified speakers using proper RCA cables.
- Optionally connect a prair of Headphones to your computer's sound output (Headphones socket).
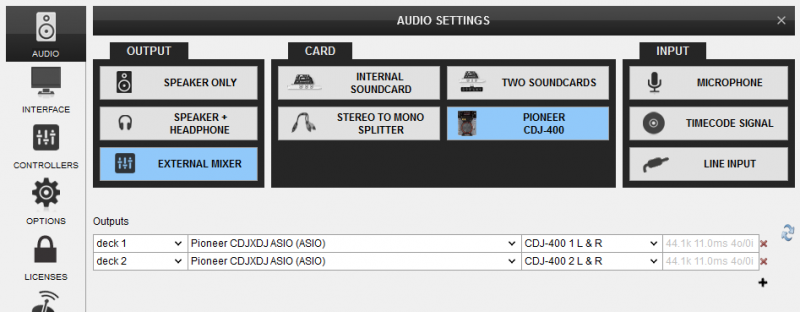
- Manually create the following audio setup and click to APPLY

- Use the EJECT button (hold for more than 1 second) to cycle control through the available VirtualDJ decks.
- Use the mixer of the VirtualDJ GUI to mix (using mouse or keyboard shortcuts)
B. PAIR OF UNITS - MIXER WITHOUT SOUND CARD
In this case a mixer without built-in sound card is used.
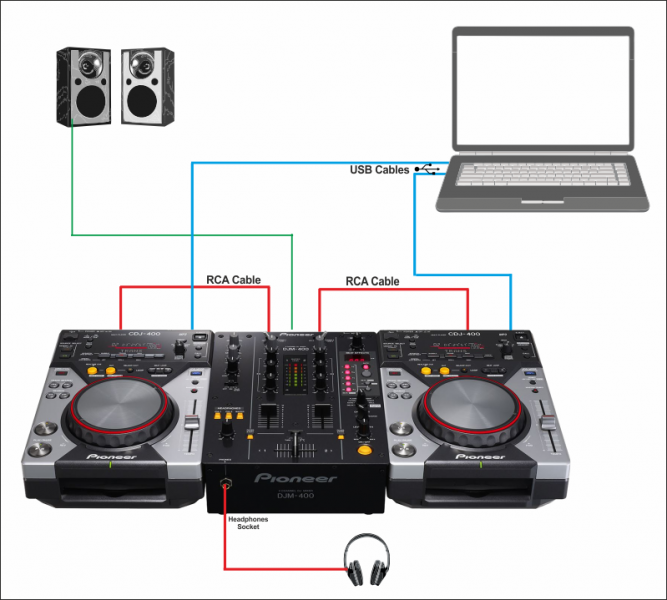
- Connect each one of the CDJ-400 with a USB port of your computer
- Connect the Audio Out of each CDJ-400 with an Input channel of your mixer using proper RCA cables. This connection is to route the audio signal of the USB Audio interface to the Output of the mixer
- Connect your amplifier or amplified speakers to the Master Output of your mixer.
- Connect your Headphones to the Headphones socket of your mixer.
- Click on the CDJ-400 special button in the CARD tab of the AUDIO tab of VirtualDJ Settings to automatically generate the necessary audio configuration.
- Click to APPLY.
C. PAIR OF UNITS - MIXER WITH SOUND CARD
When a dj mixer with a built-in sound card is available, then the sound cards of the CDJ-400 can be excluded from the audio configuration and use the built-in sound card of the mixer instead. This case is preferred unless a DJ changeover is required and the mixer is not equipped with a dual USB Audio interface.
The example below shows the connections and the audio configuration of a pair of CDJ-400 along with a Pioneer DJM-S9 mixer.
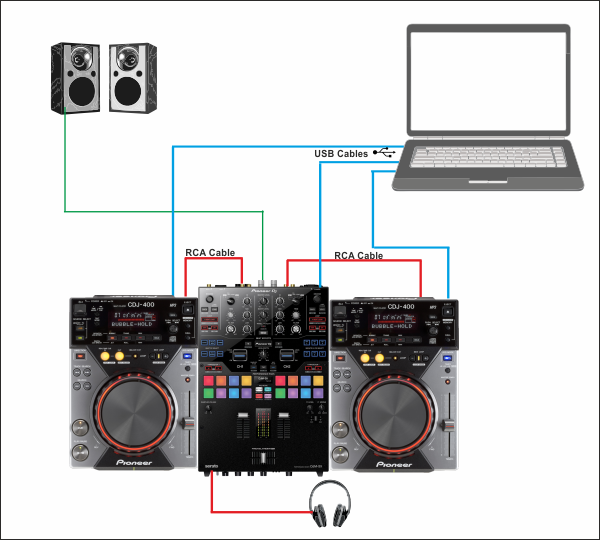
- Connect your CDJ-400 units with a USB port of your computer using a USB cable. This connection ensures the MIDI/HID control of a VirtualDJ deck
- Connect your USB mixer with a USB port of your computer as well
- Connect the Audio Outputs of the CDJ-400 units to the input channels of your mixer using proper RCA cables. This connection is optional and only necessary in case you need to use your CDJs to playback tracks from CDs or media from a USB flash drive..
- Connect your Headphones to the relative socket of your mixer.
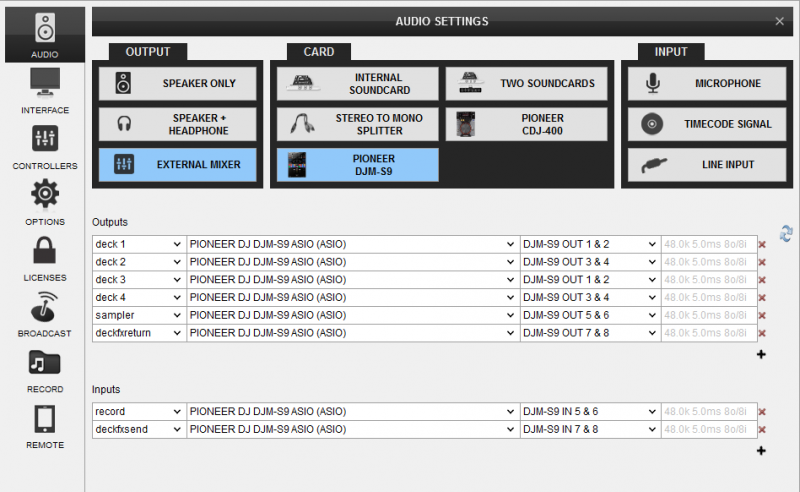
- If available click on the special button in the Audio tab to configure the audio using the built-in sound card of the mixer or manually create a similar setup if the mixer is not natively supported. Click to APPLY
TROUBLESHOOTING
Due to inconsistent device enumeration of the Operating systems (mainly on Windows), when the CDJ-400 are connected to a USB port, the sound and control could be reversed (left-side unit controls right VirtualDJ deck and vice-versa). Easiest way is to swap the USB cables, mark the used USB ports and always connect to the same ones in the same order , but if not possible or not solving both issues, below is the procedure you need to follow.
A. Configure VirtualDJ Deck Control
An easy and safe way to determine which VirtualDJ deck each CDJ-400 is controlling is to move the Pitch/Tempo fader up and down and observe the Pitch faders on the GUI of VirtualDJ. If you find that the CDJ-400 units control a different deck than the one you wished to, then :
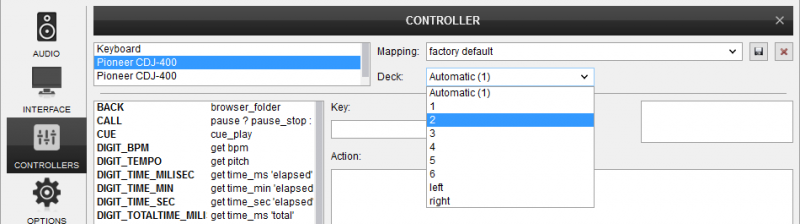
1. Open VirtualDJ Settings and select the CONTROLLERS tab.
2. Click on the CDJ-400 unit from the left-side devices list.
3. On the right-side change the assigned deck by choosing the desired one from the Deck drop-down list. E.g. from Deck 1, choose Deck 2. This will assign the unit to the correct VirtualDJ deck.
4. Repeat steps 2 and 3 for any other additional CDJ-400 you are using.
5. Close VirtualDJ Settings and verify proper Deck control by moving the pitch faders.
B. Configure Audio Routing
If you find that the audio routing is incorrect and the RCA cables are connected to the correct mixer input channels (or no access to the back of the mixer), you may change the audio routing as following:
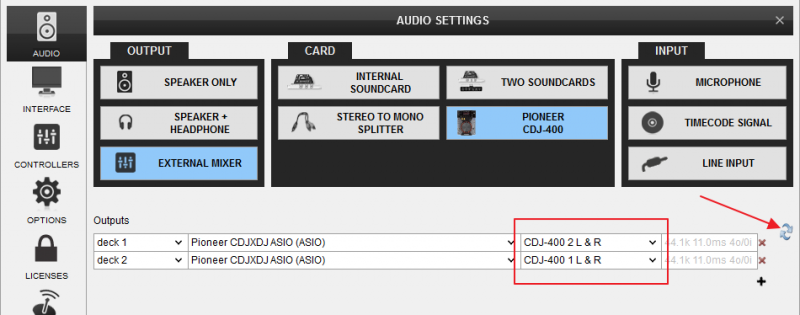
1. Open VirtualDJ Settings and select the AUDIO tab.
2. In most of the cases a simple channel swapping will correct the issue. Click on the swap icon at the right-side of the audio configuration list, or manually change the Channels that each deck is using
3. Click to APPLY.
4. Verify proper audio routing and close VirtualDJ Settings